Baklava

Baklava, a Mediterranean sweet, has become a favourite in my family after my Grandmother introduced it to our family just a few years ago.

Chicken Mandi

An authentic Chicken Mandi recipe from Saudi Arabia

Sahlab

A delicious hot milk drink or dessert, perfect for cold and chilly days.

Shakshouka (شكشوكة)

Saudi-style scrambled eggs, a popular breakfast dish introduced to me by a friend.

Ful Mudammas (فول مدمّس)

A very popular dish throughout the Middle East, that can be made in a variety of different ways depending on which region you are in.

Showing posts with label Middle Eastern. Show all posts

Ramadaan Mubaarak and Ma'amoul

Firstly, Ramadaan Mubarak to all Muslims around the world! May Allah make this month a blessing for us all, that we drawer closer to Him, seeking His Forgiveness and His Pleasure.

Today I have a rather quick recipe post, since I decided to make Ma'amoul ( for the first time) this morning. I don't yet know if it turned out any good. We fast for 20 hour here in Scotland, so I've still got another 9 hours to go before I can try them ;)
This is also usually made with semolina, which I did not have, hooray for using what is available to hand.


Ingredients
8oz Plain Flour
4oz Butter
3tbsp Water
2tsp Rose Water
7oz Date Paste

Optionals
Spices and/or nuts to add to the date paste (I used cinnamon, though cardamom as well as pistachios are often used)
Icing Sugar for dusting.
Add butter and flour to a bowl, rub together until it resembles bread crumbs
Add water and rose water and using a knife, mix until combined and a dough is formed.
If it become too sticky add more flour.
Cover and leave to rest for 30min.
In another bowl, sprinkle on your cinnamon if using
Squeeze paste together with fingers to ensure even distribution of cinnamon
*if you are not using any spices or nuts in your filling then you can just use the date paste straight from the packet, save on washing up, you know ;) 
Take a bit of dough (however big or small depending on  the size you want them) and roll into a ball

Flatten dough by pressing you palms together and add some date paste.
Fold the sides up and press together, gently roll back into a ball shape.


Now if you are cool, you'll have one of these nifty ma'amoul cookie presses and life will be incredibly easy for you people.
If you are no so cool, like myself, continue to spend the next hour of so hand pressing your desired design with a knife.
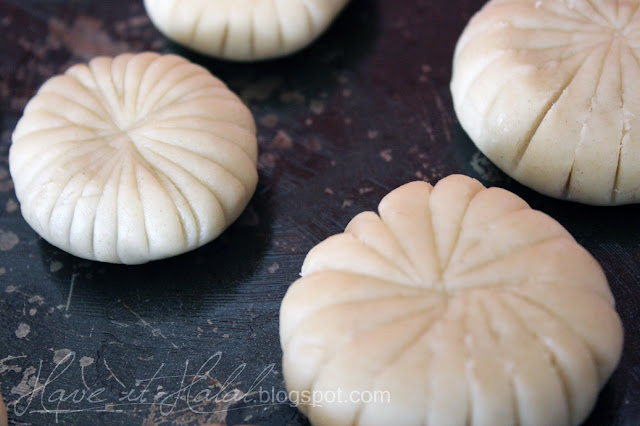
Place on a lightly greased tray and over loosely with foil
Bake in a preheated oven, (180C) for about 20-25min, removing foil half-way through cooking

Allow to cool completely, then dust with icing sugar if you so wish.
Enjoy! (Or fight with the temptation to try one for 9 hours ;) )

British take on Ma'asoob (معصوب)

So this is no proper 'traditional' recipe, but just a British variant because I can't find any decent Middle Eastern bread to use for it. Alas, the bog standard loaf of wholemeal bread that was laying around would have to do! And I think it worked quite well, if I do say so myself.

EDIT: So I just found out from a friend that the bread usually used to make this is called 'fateerah' (فطيرة) and that it is actually the same as South Asian 'Parathas'. So if you can find either, use that! :)

Ingredients

2 Bananas
3 Slices of bread (wholemeal if you wanna be healthy)
Optionals:
Dates
Some extra thick spooning cream (Not single or double)
Runny Honey

In a Large bowl, mash up your banana

Add your chopped dates if using

Toast you bread until lightly golden brown, do not burn!

Crumble the toast into the bowl by squeezing and rubbing it in your hands

Mash it all up some more with the help of a potato masher

Add a large spoonful of cream if using

Mix it all up

Place in a microwavable dish and heat until hot, drizzle with honey (optional) and serve.
And do not be fooled by what looks like a very modest portion size, there is 3 slices of bread, 2 whole banana, 4 dates, cream and honey in the dish! ;)

Arabic/Sugar Wax

Quite a few friends have been asking how I make this, so I figured a a blog post would suffice.

Sugar wax has been used by Arab women for centuries if I remember right. I can across a recipe for it while looking for a cheaper alternative to store bought stuff. And what could be cheaper than using just three things that a probably already in your kitchen?

Another great thing about this wax it that it is completely natural with no weird added chemicals and can be used on sensitive skin. It's safe enough to be used on any area of the body including sensitive areas such as  the face*, underarms and bikini area.

I'm going to state this now and very clearly: Waxing WILL hurt. You can't get around it. Many people claim sugar waxing does not hurt at all. They lie. Though the pain will be somewhat less than store bought wax. The reason for that is store wax stick to both your hair and your skin. So when you pull it off, you are pulling those hairs, but you are also pulling of the top few layers of dead skin. Which can be a good thing if you don't exfoliate much. But in short: ripping out hairs and the top layers of skin will hurt!

With sugar wax, you only pull out the hairs as it barely sticks to your skin, therefore less pain, but still expect pain!
And the more you wax, the more you get used to the pain and the less it bothers you :) Another benefit of waxing is that your hair stays away longer, grows back slower, lighter and thinner in comparison to shaving.

*Men, please do not wax your facial hair. I don't just say this because I am biased, and prefer men with some facial hair and brothers to uphold the sunnah of keeping a beard. But biologically the hair on a man face was designed to stay where it is! If you must remove the hair on your face then shave it instead of waxing.

WARNING: Hot sugar is extremely, well.. hot. Do not touch the mixture at all with bare skin until it has cooled unless you want a real nasty burn!

Ingredients
2 cups of white sugar
Quarter cup of lemon juice
Quarter cup of hot water.


Add your 2 cups of sugar to a medium sized cooking pan

Add you lemon juice and hot water

Bring to a steady boil at medium-high heat

Keep boiling, you'll notice the colour soon change
Once you have a rich golden brown colour you are done.
Pour into a heat resistant container (I use glass jar) and leave to cool down before using.
If it cools to the point of being hard, just pop it in the microwave for a few seconds to soften :)

And I have no final picture for you because I got distracted by a phone call and ended up letting it cook to long. I did manage to salvage it, but it was not pretty!

Happy and safe waxing! 


Ful Mudammas (فول مدمّس)

Ful Mudammas
Ful Mudammas is a very popular dish throughout the Middle East, and can be made in a variety of different ways depending on which region you are in. The first time I tried this I really disliked it - then again, it was an imported 'ready to eat' canned version of the stuff that I tried. Since all my Middle Eastern friends stood by their claims that it was a staple dish that rich and poor alike both ate, I decided to give it another try making it myself - the results were quite different!

I won't claim this recipe is from any specific region, because it is not. I searched a wide variety of recipes, all of which differed in some way or another. When the time came to try our this dish again I didn't bother with a recipe at all. I went with what I remembered from the various recipes I had found. Since I also had no sort of Arabic bread available, with which ful is usually served, I decided to be a typical Brit and make toast instead!

Ingredients
Serves: 2

Ingredients
1 can/tin of brown broad beans
1/2 a bell pepper (any colour is fine), diced
1/2 a medium onion, diced
1/2 a tomato, chopped
1/2 a tsp of ground cumin
1 tsp of crushed garlic
1 tbsp of tomato puree*
1 cup of water
juice of 2 lemons (or to taste)
salt and black pepper, to taste

*In Britain, tomato puree, usually refers to what is known in America as concentrated tomato paste


Fry the onion until translucent

Add bell pepper and fry for a further 3 min

Add tomato and fry until soft

Add ground cumin and crushed garlic, fry for a futher 30s

Add 1 cup of cold water, tomato puree* and the broad beans.
Bring to the boil then reduce heat to low and cover with a lid.

Simmer on low heat for about 10min or until liquid has reduced by half , it should look as above

Mash the beans with a potato masher or the back of a spoon, for a chunky consistency
You could serve it  like this, or if you want a smoother texture give it a further whizz with an electric hand blender or in the food processor.


Once you have your desired consistency/texture, mix in the lemon juice, salt and pepper to your preferred taste
This above photo shows the consistency/texture after using a hand blender
Serve with Arabic Flat bread, or any other type of bread ;)


Saudi Scrambled Eggs (شكشوكة‎)

Some exciting new and a new recipe today!

First off, I got a new camera which I am utterly overjoyed with. A Canon EOS 600D, perhaps not the most 'professional' camera out there, but it does what I need it to - and I'm a poor student remember ;)

I have to admit I made this blog not even having the right equipment from the start. I don't know much about HTML, but if found this wonderful template and tweaked with it a bit (from what little I could remember from my younger days) for my needs until I was happy. Then when I wanted to post some recipes I realised I didn't have a decent camera. My little point and shoot would I worked, if course, but the quality would not be great.
So I took to pinching a few photos from other blogs (you'll find all the credits below the picture though!). Despite crediting the original source, I still felt kinda bad for taking them.

But now, oh boy, ya walad! I am going to have fun with this new beauty!
So to test it out I snapped each step of making my breakfast this morning - Scarmbled Eggs, Saudi style a.k.a shakshouka/شكشوكة‎


On with the recipe!

Serves: 1-2 (I am greedy and ate it all to myself :p)
Ingredients

3 medium eggs
Half a medium onion, diced
One third of a green bell pepper, diced (other colours work too, but green will look the prettiest. I used red since there was already a third left over. No need to waste ;) )
Half a tomato, chopped
Half a tsp of ground cumin
Quarter of a tsp of salt
Quarter of a tsp of black pepper

Optional
Dash of milk
Tsp of butter

Ingredients
Lightly beat your eggs (milk and butter, if using) with a fork until mixed

Fry onion in some olive oil until they start to turn golden

Add pepper and fry for a further 3 min


Add tomato and fry for a further 3min

Sprinkle on about half of the ground cumin and fry for a further 30seconds

Add your egg mix (those lumps are from the butter which was optional!)

Sprinkle on the salt, black pepper, and the rest of the ground cumin
Tip: you could just leave to cook like this to make an omelette ;)

Mix mix mix, and keep mixing until the egg is cooked!

Once the egg is cooked it will look something like this.


Shakshouka is normally served with Arabic flat bread, which I have been told is the same a pita bread, but also been told it is not the same a pita bread. So right ow I have no clue! I was going eat it with some pita but then noticed little spots of mould on mine (oops) so I just ate it on it's own and it was still extremely satisfying! Enjoy :)


Sahlab (سحلب) Recipe

Image from tasteofbeirut.com

Sahlab (سحلب) is a popular beverage found all over the Middle East.  It is believe to have originated in Turkey during the Ottoman Empire. Traditional sahlab flour is make by grinding the dried tubers of orchids into a fine power. It is then thickened with milk or water and sweetened with orange blossom or rose water.

Unfortunately the plants used to make traditional sahlab flour are endangered and hard to come by in markets. Instead we offer and alternative recipe using cornflour as the thickener, while still retaining a similar taste to that of traditional sahlab.

Servse: 2


Ingredients.

2  cups of milk (plus a small amount extra)
2 tbsp of cornflour
2 tbsp of sugar (or to taste)
1 tbsp of rose water

Crushed nuts and ground cinnamon (optional)


Measure out your 2 cups of milk and pour into a saucepan

Turn on the heat to medium-high. Bring milk to a light boil.


Add 2 tablespoons of corn flour into a small amount of milk and mix well ensuring there are no lumps.

Add your cornflour and milk mixture to the lightly boiling milk. Reduce heat to low and whisk regularly until thickened to avoid lumps.


Once thickened, add 2 tablespoon of sugar (or to preferred taste) and 1 tablespoon of rosewater.


Pour into desired cups or bowls and garnish with ground cinnamon, chopped nuts (optional) and enjoy!
Image from tasteofbeirut.com